Uncategorized

Load and View .img Files in Garmin Basecamp

If you have an .img file on your Garmin GPS device and you want to view the same map in BaseCamp, there’s a way of loading it in without any complex conversion utilities. The map will also load in BaseCamp just as quickly as if it was installed on your machine. These instructions are for Windows and assume your .img file isn’t locked and doesn’t require authentication to view.

  1. Download and install ImDisk Virtual Disk Driver. Once installed, open Control Panel and select ImDisk Virtual Disk Driver
  2. Click Mount New…
  3. In the Mount New Virtual Disk window that appears:
    1. Select any Drive Letter
    2. Set the Size of Virtual Disk to be slightly larger than the .img file you want to view. For example, if your .img file is 3.5GB create a virtual disk that is 4GB in size.
    3. Make sure Removable Media is checked
    4. Leave the other fields with their default values
  4. Press OK
  5. Open File Explorer and open the drive letter that you set earlier. You should be prompted to format the disk you just created. Select Format Disk
  6. Make sure the File System is set to FAT32 and that Quick Format is checked. Press Start
  7. Once the drive has been formatted, create a folder named Garmin inside of it
  8. Copy your .img file into the Garmin folder you just created
  9. Download and install JaVaWa Device Manager. Once installed, open the program
  10. Press Scan Drives
  11. Click the Manage Maps button for the drive you just created
  12. Select the .img file in the window that appears and click the Visible in BC button.
  13. Click Yes to confirm that you want to change the visibility of the .img file
  14. Close JaVaWa Device Manager
  15. Open BaseCamp. Wait a while and your drive should appear as a Memory Card on the left hand side listing the map inside of your .img file.
  16. Open the Maps menu at the top and select the map inside your .img to view it

At this point you should be able to view the map in BaseCamp. However, you will find that if you restart your computer, the virtual disk you created will disappear. To save you from having to repeat the steps above to recreate the virtual disk, you can create a snapshot of the disk so that you can load it quickly in the future.

To create a snapshot of your virtual disk:

  1. Open Control Panel and select ImDisk Virtual Disk Driver
  2. Select the drive you wish to create a snapshot of and click the Save Image… button
  3. Press OK and select a location to save your .img file

To quickly recreate the virtual disk after a shutdown or restart:

  1. Open Control Panel and select ImDisk Virtual Disk Driver
  2. Click Mount New…
  3. In the Mount New Virtual Disk window that appears:
    1. Select the Image File of the snapshot you created. This is NOT the .img file of your Garmin map, select the .img file you created with ImDisk earlier
    2. Select any Drive Letter
    3. Make sure Virtual Disk Drive Accesses Image File Directly is selected
    4. Make sure Removable Media is checked
    5. Leave the other fields with their default values
  4. Press OK. Your virtual disk should be created and mounted. You can now open BaseCamp to view your map

This method has been confirmed to work on Windows 8.1 with Basecamp 4.6.2, ImDisk 2.0.9 and JaVaWa Device Manager 3.8
Opening and Closing Tabs Using Selenium

In this post I reference methods in the Selenium C# client driver. Equivalent methods should exist in whichever other language client driver you use. 


Some testing requires opening a new window, performing an action, then closing that window, perhaps even returning to the original window to continue the test. There are many, many ways of managing tabs in selenium, so lets take a look at what works and what doesn’t.

Tabs = Windows

First of all, Selenium really has no concept of what a tab is and how it differs from a window. Each WebDriver instance has a reference to it’s current window handler, which is points to the current tab or window that driver is interacting with. When managing tabs, we have to be able to create a window handler, switch to it, do some stuff, then switch back to our original window handler.

Creating Tabs

There are many ways of opening a new tab. You could do it by clicking a link, using a keyboard shortcut, initializing a new WebDriver instance, or even typing some JavaScript into the developer console. Unfortunately not all of these methods are reliable in Selenium. For instance, having the WebDriver send the keyboard command “Ctrl + T” would open a new tab when testing locally on my machine, but when running the test using Selenium Remote Server, the keyboard command would be ignored entirely. There are also known bugs related to sending keyboard shortcuts through the WebDriver, some dating as far back as 2012. Initializing a new WebDriver works, but is quite resource intensive and requires having to keep track of the state of multiple WebDriver instances. Clicking a link is also somewhat unreliable since Selenium doesn’t handle links using target="_blank".

The most reliable method I have found is to create your tabs using JavaScript. This is done by simply executing a window.open().

Switching Window Handlers

So now you have a new tab in your browser, but you still need to tell your WebDriver to switch to it, otherwise commands will continue to be sent to the original tab. This is actually pretty easy and is done using the SwitchTo() command into which you pass the window handler that you want to switch to.

The Code

So putting everything together, here is what the code would look like to:

  • Create a new tab
  • Switch to it
  • Do something in the new tab
  • Close the new tab
  • Switch back to our original tab
// save a reference to our original tab's window handle
var originalTabInstance = myWebDriverInstance.CurrentWindowHandle;
// execute some JavaScript to open a new window
myWebDriverInstance.ExecuteJavaScript("window.open();");
// save a reference to our new tab's window handle, this would be the last entry in the WindowHandles collection
var newTabInstance = myWebDriverInstance.WindowHandles[Driver.Instance.WindowHandles.Count - 1];
// switch our WebDriver to the new tab's window handle
myWebDriverInstance.SwitchTo().Window(newTabInstance);
// lets navigate to a web site in our new tab
myWebDriverInstance.Navigate().GoToUrl("www.crowbarsolutions.com");
// now lets close our new tab
myWebDriverInstance.ExecuteJavaScript("window.close();");
// and switch our WebDriver back to the original tab's window handle
myWebDriverInstance.SwitchTo().Window(originalTabInstance);
// and have our WebDriver focus on the main document in the page to send commands to 
myWebDriverInstance.SwitchTo().DefaultContent();

This approach works when executing tests both locally and remotely. Keep in mind that you can only execute a window.close() on a tab that was initially opened using a window.open().

Importing libraries into Android Studio

Not all Android libraries out there provide a Maven dependency to include it into your project. Sometimes you will just have to resort to the original method of just including the source code in your project.

For this example, I will be importing the SlidingMenu library for Android by Jeremy Feinstein.

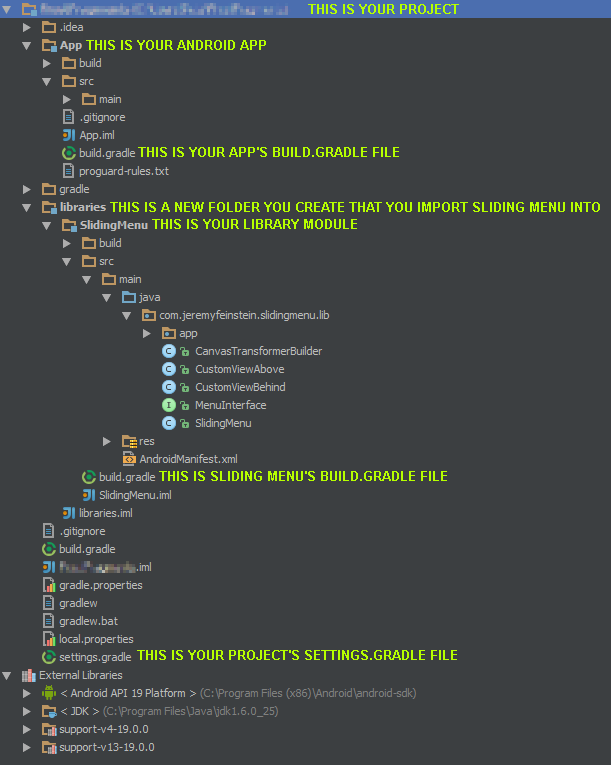
First of all, allow me to illustrate the folder structure of your entire project:

importlibrary

To achieve this structure, you will have to create library folder in the root of your project, and import the code library you want to include into it as a module. Note that if the code library you are trying to import doesn’t already have a build.gradle file, you may need to import it into Eclipse first and generate the necessary build.gradle file (as of writing this post, Android Studio is unable to generate build.gradle files for eclipse projects).

Next, based on the naming conventions I established in the image above ensure you have the following:

In your APP’s build.gradle file make sure you have:

dependencies {
    // Your other dependencies go here
    compile project(':libraries:SlidingMenu')
}

This tells Gradle that your App has a dependency on SlidingMenu.

In SLIDING MENU’s build.gradle file make sure it has the following:

buildscript {
    repositories {
        mavenCentral()
    }
    dependencies {
        classpath 'com.android.tools.build:gradle:0.7.+'
    }
}

apply plugin: 'android-library'

repositories {
    mavenCentral()
}

dependencies {
    compile 'com.android.support:support-v4:19.0.0'
}

android {
    compileSdkVersion 19
    buildToolsVersion "19.0.1"

    defaultConfig {
        minSdkVersion 7
        targetSdkVersion 16
    }

    sourceSets {
        main {
            java.srcDirs = ['src/main/java']
            res.srcDirs = ['src/main/res']

            manifest.srcFile 'src/main/AndroidManifest.xml'
        }
    }
}

This tells Gradle how to compile and build the Sliding Menu module. We’re telling it that Sliding Menu depends on the Android V4 Support library, the SDK version target to build against, and finally, the folders paths where the source code, resources, and manifest files are located.

Your PROJECT’s settings.gradle file should look like this:

include ":libraries:SlidingMenu", ':App'

This tells Gradle the modules it should build for your entire project, and the order to do it in. Obviously we want to build Sliding Menu before we build our app, because Sliding Menu is a dependency and it expects it  to be already compiled.

In android studio press the Tools -> Android -> Sync Project with Gradle Files button, then rebuild your project. If all went well you should be able to import the com.jeremyfeinstein.slidingmenu.lib.SlidingMenu library into your app’s source files.

Registering global filters in ASP.Net MVC 4 with Autofac

Suppose we have a custom filter defined as follows:

public class CustomFilterAttribute : ActionFilterAttribute
{
    public MyPropery Property { get; set; }
    ...
}

There’s a new way of registering MVC global filters using AutoFac. First, remove the filter registration from your RegisterGlobalFilters because we will have Autofac handle adding them to our controllers/actions instead of MVC.

Then, register your container as follows:

var builder = new ContainerBuilder();
builder.RegisterControllers(Assembly.GetExecutingAssembly());

builder.RegisterType<MyProperty>().As<IProperty>();

builder.Register(c => new CustomFilterAttribute(c.Resolve<IProperty>()))
                .AsActionFilterFor<Controller>().InstancePerHttpRequest();

builder.RegisterFilterProvider();

IContainer container = builder.Build();

DependencyResolver.SetResolver(new AutofacDependencyResolver(container));

Note that by passing in the Controller class into the extension AsActionFilterFor() we are telling AutoFac to apply this filter to all classes that derive from the Controller class (which, in MVC, is all controllers). Since we are calling AsActionFilterFor() without any arguments, we are also specifying we want to have the filter applied to all actions within the specified controllers. If you want to control the scope of your filter, such as applying it to a specific controller and action, you can use lambda expressions like so:

builder.Register(c => new CustomFilterAttribute(c.Resolve<IProperty>()))
    .AsActionFilterFor<HomeController>(c => c.Index())
    .InstancePerHttpRequest();

If your action takes a parameter, use the default keyword to specify:

builder.Register(c => new CustomFilterAttribute(c.Resolve<IProperty>()))
    .AsActionFilterFor<HomeController>(c => c.Detail(default(int)))
    .InstancePerHttpRequest();

Note that you have to use a different extension method based on what type of filter you are registering, here are the supported filter types:

  • AsActionFilterFor
  • AsAuthorizationFilterFor
  • AsExceptionFilterFor
  • AsResultFilterFor

Frost 2.5 Released

A note to Android 2.2 (Froyo) users: please backup your stash prior to updating. There is a bug in your version of Android that will wipe your stash when updating the app. Please see the FAQ for instructions on how to backup Frost and this post for more details.


We just released update 2.5 for Frost. As I mentioned in our previous post, we focused on the browser interface for this release. Our goal was to eliminate clutter in the options menu, and we’ve achieved this by moving a lot of common browser actions to a quick action menu in the tab bar. In future updates we will be working towards eliminating the options menu entirely as more devices are released without any hardware menu buttons.

The next biggest change is the addition of tab sessions. From now on, whenever you log into your stash you will be prompted to restore the tabs from your previous private session. Note that in order for your tab session to be saved, you need to be logged into your stashes.

Finally, there are countless optimizations and bug fixes. We’ve fixed some compatibility issues with some websites like Gmail and Twitter, as well as changed the way batch operations are handled to improve reliability and performance.

Please don’t hesitate to contact us with feedback using the contact form at the top of the page.

Frost Version 2.5

  • New browser interface
  • Added tab sessions. When logging into your stash you will be prompted to restore tabs from your previous private session
  • Added DOM storage support
  • Added password mask
  • Added support for new devices without menu buttons
  • Updated Import to SD interface
  • Improved batch data operations
  • View Image option will now open a new tab (Thanks John!)
  • Fixed tab cutoff bug
  • Fixed several site loading issues: Gmail, Twitter, etc. (Thanks V!)
  • Fixed crash on rotation
  • Fixed several rare crashes
  • A lot of code cleanup & optimization