Software Development

Precompiling ASP.NET MVC applications with Teamcity & Octopus

Notice the first time you open a page or view in your ASP.NET MVC application, it’s takes quite a bit longer, and subsequent loads are faster? This is because they are compiled on-demand by IIS the first time someone tries to access them – dynamically being turned into an alpha-numerically named DLL. There are quite a few problems with this process:

  • Some errors in your razor code won’t be made apparent until the view is compiled after being accessed for the first time. If you follow the principle of “crash early”, then you’ll agree the web server is much too late for this to happen!
  • Web servers are meant to serve web requests, not compile code. Compiling views comes with a performance overhead that may affect the performance of concurrent requests.
  • If a user is unlucky enough to be the first to access a view they will be met with a long load time, giving a poor impression that something may be wrong.

In this post I will show you how to setup true precompilation for your ASP.NET application. The goal is to package our entire web application, including views, into one or more DLL files. This comes with many benefits:

  • Any compilation errors in your razor code are found well before any code is deployed to a web server.
  • Compilation is done on your build server, allowing you to create a deployment package that requires no additional compiling on the web servers.
  • Users are no longer victim to long load times the first time a view is accessed.

I am assuming that you already have a build and deploy process setup using Teamcity and Octopus. I will be showing you the small tweaks necessary to that process to make precompilation work.

Setup a Publishing Profile

We’re going to leverage publishing profiles as a way of instructing MSBuild on how to compile our project.

  1. Start by right clicking your web project in Visual Studio and clicking Publish…
  2. You will be asked to select a publish target. Select Custom and enter a profile name when prompted
  3. Under publish method select File System
  4. Under target location enter $(ProjectDir)precompiled and click next
  5. Select the build configuration you want to apply, and under File Publish Options make sure both options to delete all existing files prior to publish and precompile during publishing are both checked
  6. Click the Configure button that is next to the precompile during publishing option. Details on all the options in this window are documented on MSDN. For now we will make sure the allow precompiled site to be updatable option is unchecked. Select the option to Merge all outputs to a single assembly and enter a name for the DLL file, for example MyWebProject.Precompiled
  7. Close out of the dialogs. You can push the publish button to test your profile. Once the compile is complete, you should be able to go into your project directory and see a new folder called precompiled. Inside of it you will find the bin folder where you will see some new compiled DLL’s that weren’t there before. Those are your precompiled views.

If you look in the Properties folder in your project you should have a new folder called PublishProfiles containing an xml file with the profile configuration. Here is a sample of what it may look like:

<?xml version="1.0" encoding="utf-8"?>
<!--
This file is used by the publish/package process of your Web project. You can customize the behavior of this process
by editing this MSBuild file. In order to learn more about this please visit http://go.microsoft.com/fwlink/?LinkID=208121. 
-->
<Project ToolsVersion="4.0" xmlns="http://schemas.microsoft.com/developer/msbuild/2003">
 <PropertyGroup>
 <WebPublishMethod>FileSystem</WebPublishMethod>
 <LastUsedBuildConfiguration>Release</LastUsedBuildConfiguration>
 <LastUsedPlatform>Any CPU</LastUsedPlatform>
 <SiteUrlToLaunchAfterPublish />
 <LaunchSiteAfterPublish>True</LaunchSiteAfterPublish>
 <PrecompileBeforePublish>True</PrecompileBeforePublish>
 <EnableUpdateable>False</EnableUpdateable>
 <DebugSymbols>False</DebugSymbols>
 <WDPMergeOption>MergeAllOutputsToASingleAssembly</WDPMergeOption>
 <UseMerge>True</UseMerge>
 <SingleAssemblyName>MyWebProject.Precompiled</SingleAssemblyName>
 <ExcludeApp_Data>False</ExcludeApp_Data>
 <publishUrl>$(ProjectDir)precompiled</publishUrl>
 <DeleteExistingFiles>True</DeleteExistingFiles>
 </PropertyGroup>
</Project>

MSBuild Precompiling Views in Teamcity

Now that we have a publishing profile setup, the next step is to automate the precompilation step in Teamcity.

  1. Add a new MSBuild step to your current build configuration (you do have one setup already to compile your project, right?). We will want this to be one of the last steps in our configuration.
  2. Give it a name, point the build file path to your solution file, and set the command line parameters to the following:
/p:DeployOnBuild=true
/p:PublishProfile=<YourPublishProfileName>.pubxml
/p:VisualStudioVersion=14.0
/p:Configuration=Release
/p:AspnetMergePath="C:\Program Files (x86)\Microsoft SDKs\Windows\v8.1A\bin\NETFX 4.5.1 Tools"

And that’s it, Teamcity will invoke MSBuild using the publishing profile we created earlier, and generate the precompiled DLL’s.

If you are going to be deploying using Octopus, make sure the Run OctoPack option is checked in the build step.

Creating an Octopus Package

The last step is to take our precompiled application and package it up for octopus to deploy. The first thing we need to do is create a .nuspec file in our project, make sure it has a build action property of Content. This will tell OctoPack how and what to package in our project. Name the .nuspec file the same as your web project and enter the following:

<?xml version="1.0"?>
<package xmlns="http://schemas.microsoft.com/packaging/2010/07/nuspec.xsd">
 <metadata>
  <id>MyWebProject</id>
  <title>MyWebProject</title>
  <version>0.0.0.0</version>
  <authors>Me</authors>
  <description>The MyWebProject deployment package</description>
  <releaseNotes></releaseNotes>
 </metadata>
 <files>
  <file src="precompiled\**\*.*" target=""/>
  <file src="Web.*.config" target=""/>
 </files>
</package>

Basically we’re telling OctoPack some basic information about our project, and to include everything in the precompiled folder into our package. We are also asking Octopack to include any extra config transformations, this is optional but necessary if you wish to perform config transformation during your Octopus deploy process.

That should be it. Now when TeamCity runs, it will tell MSBuild to precompile all your views into one or more DLL’s using the publishing profile you created. Once that is done it will invoke OctoPack which will look at the nuspec file in your project and create an Octopus package containing the contents of the precompiled folder. You can then push that package to your Octopus server where it can then be deployed to your web servers.

Adjusting Zoom Level To Add Padding To Map Bounding Boxes – Bing Maps V7

Suppose you have a cluster of map pins, and you want the map to zoom and center on those pins such that they all fit on the user’s screen. This is normally accomplished by passing a list of pins into a helper method that spits out  a bounding box, you then set your map’s view to that bounding box.

The problem with this approach is that you will always end up with at least 2 pin from your cluster appearing on the absolute edge of your bounding box, which translates to being on the precise edge of the user’s screen. And depending on how your pins appear, it may be entirely invisible to your user, who may not realize they have to pan their view slightly to view the missing pin.

The solution is to add padding to the edges bounding box, so that we can be sure that all pins appear in the user’s view with some space to spare from the edges of the map. We can accomplish this by adding two fake pins (that won’t appear on the map) to our list of pins, positioned in such a way that they stretch the bounding box by a percentage of it’s original size.

Here is a diagram of what this approach looks like:

bingbounding

The solution can be broken down as such:

  1. While populating our list of pins to create our bounding box, keep track of the maximum and minimum values of both longitude and latitude for all pins. This will give us the boundaries of the original bounding box.
  2. Using the maximum and minimum values for both longitude and latitude, we can calculate the latitudinal width and longitudinal height of our original bounding box.
  3. We can apply an arbitrary percentage to the height and width of the bounding box and calculate the coordinates needed for our two fake pins. These fake pins will be outside of the original bounding box, and when added to our list of pins, will force the resulting bounding box to grow based on the percentage used in the calculations.
  4. Input the modified list of pins into the bounding box helper method, returning an expanded bounding box.

So what does this look like in code? (Bing Maps AJAX v7.0)

function focusOnPinCluster(cluster) {
	// array that stores our list of pin locations
	var locations = [];

	var maxLat = -90;
	var minLat = 90;
	var maxLon = -180;
	var minLon = 180;

	// populate the locations array with the passed in pins
	for (var i = 0; i < cluster.length; i++) {
		var pin = cluster[i];
		locations.push(new Microsoft.Maps.Location(pin.Latitude, pin.Longitude));

		// update max lat/long values
		if (pin.Latitude > maxLat) { maxLat = pin.Latitude; }
		if (pin.Latitude < minLat) { minLat = pin.Latitude; }
		if (pin.Longitude > maxLon) { maxLon = pin.Longitude; }
		if (pin.Longitude < minLon) { minLon = pin.Longitude; }
	}

	// add 2 locations that push the bounding box out by a % of its size
	var pctBuffer = 0.05;
	var latBuffer = (maxLat - minLat) * pctBuffer;
	var lonBuffer = (maxLon - minLon) * pctBuffer;

	// add the two fakes pins to our location array
	locations.push(new Microsoft.Maps.Location(minLat - latBuffer, maxLon + lonBuffer));
	locations.push(new Microsoft.Maps.Location(maxLat + latBuffer, minLon - lonBuffer));

	// create a bounding box based on our location array
	var bounds = Microsoft.Maps.LocationRect.fromLocations(locations);

	// set the map view to our bounding box
	_map.setView({ bounds: bounds });
}

The result will have our cluster of pins appear zoomed and centered in the map, with a healthy margin between the pins and the edge of the screen.

Ignoring time when filtering dates in Telerik Kendo grids

kendofiltering
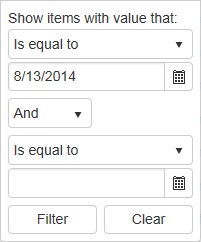
To the right is what the filter looks like on a Telerik Kendo grid when Filterable(true) is set on a DateTime column.

If I was a user, I would expect the grid to return all rows that match the date (8/13/14) regardless of the time associated with that date. If it’s 8/13/14 02:00 or 8/13/14 17:41, the expectation is that they should all appear because I am asking the grid to show me all the data that occurred on that date.

Instead, the Kendo grid defies that expectation and will only return data that precisely matches the date, at midnight, ie. 8/13/14 00:00:00. I’ve had users who were convinced this functionality is actually a defect, when it was just a case of it being really unintuitive.

So, the goal is to modify the filtering behavior in the grid to effectively ignore the time, and only use the literal date when filtering data. But, still preserve the ability to sort the data by time.

After doing the prerequisite search around the Telerik forums and StackOverflow, it became quite clear that existing solutions hacks are really messy and either involve some trickery in the underlying model that is bound to the grid (ewww, no) or some nasty JavaScript (for the love of kittens, no).

The basis of my solution involves making use of a custom DataSourceRequest attribute that implements a custom model binder. The custom model binder will iterate through the filters being applied to the grid and transform them accordingly.

What do I mean by transform? Here are some examples of what happens:

isEqual("08/13/14")

becomes:

IsGreaterThanOrEqual("08/13/14 00:00:00") AND IsLessThanOrEqual("08/13/14 23:59:59")

And another example:

isLessThanOrEqual("08/13/10") AND isEqual("08/13/14")

becomes:

isLessThanOrEqual("08/13/10 23:59:59") AND IsGreaterThanOrEqual("08/13/14 00:00:00") AND IsLessThanOrEqual("08/13/14 23:59:59")

Using the same logic, I apply it to all the other possible logical operators when filtering (is not equal to, is greater than, is equal to, etc.)

So first, lets starting extending the default Kendo DataSourceRequest attribute:

We will use this attribute to decorate our request data when reading data for our grid. Next, is the heart of our solution which is the custom model binder:

First, notice the recursive calls to TransformFilterDescriptors(), this is to handle cases where the user may be requesting two or more different filters for a field. If you read through the comments in the code you will see where the original filter logic is being translated into a single or composite filter with the time set to 00:00:00 or 23:59:59 to match the appropriate situation.

Finally, we decorate the Kendo DataSourceRequest being passed into our Actions with our new [CustomDataSourceRequest] attribute. Here is what a basic Action would look like:

The added benefit of this is there is absolutely no front end work – no javascript or view model tweaking, and no page or model specific modifications. The solution is generic enough to work across all the grids and models in your application.

The full code from this post is available on Github as a Gist.

Update (2015/05/03): While at the Build 2015 conference I had a chance to speak with some of the folks at Telerik working on Kendo UI. While they do acknowledge that the current DateTime filter behavior isn’t very intuitive, their concern with making it the default is that it will affect people who expect that functionality in existing applications. So it looks like we have to make do with the solution above, at least for now.

Update (2017/11/28): Updated the code to handle the “Is Null” and “Is Not Null” filters for nullable dates. Also updated the logic to support high precision DateTime values. I also want to make a note that if you are filtering UTC DateTime objects, you will need to add a call to  .ToUniversalTime() at the end of any DateTime constructors inside the main switch loop of the TransformFilterDescriptors() method.

Preventing accidental deployments in TeamCity

One-click deployments are exactly that – one click of the “Run” button, and the magic happens. But, if you have a particularly busy project list in TeamCity, you will find yourself constantly double checking which “Run” button you are pressing, for fear of accidently running a deployment into production. It’s an unfortunate consequence of making things too easy – one little misclick can become a big mistake.

In this post I will show you how to reduce the risk of accidently running a production deployment in TeamCity by introducing a simple safety switch into the build process. At the end, upon pressing the “Run” button you will be presented with a prompt that looks something like this:

oneclickteamcity

The prompt includes a checkbox asking you to confirm that you really want to run the build. If you check it – the build will run as it normally would. If you don’t – it will fail. Effectively turning a one-click deployment into a three-click deployment, with the added benefit of no added training or documentation to other users of your build server.

Step 1

Add a new build step to your build configuration – it should be the very first step that is run. In this example I’ll make it of type Powershell – you can use other script based build types (Gradle, command line, etc.), the script will simply verify if the user has checked the confirm checkbox before the build runs.

Give the build step a name like “Deployment Confirmation”.

Set the Script option to Source code and enter the following into the Script source box:

write-host "##teamcity[message text='Starting confirmation validation...']"
if("%env.Confirm%" -eq "false") {
	write-host "##teamcity[message text='Confirmation validation FAILED' errorDetails='This is a production deployment. The confirm checkbox must be checked to proceed with the deploy process.' status='ERROR']"
	throw "Confirmation validation FAILED"
} else {
	​write-host "##teamcity[message text='Confirmation validation SUCCESSFUL']"
}​

The script basically checks the value of the build parameter %env.Confirm% that is set by the checkbox in the build prompt. If it’s false (unchecked), throw an exception that will kill the rest of the build process. If it is true, don’t do anything, and the build will continue as usual.

The rest of the fields in this build step can be left with their default values. Now would also be a good time to make sure any subsequent steps in your build configuration are set to execute “Only if all previous steps were successful”.

Step 2

Add an environment variable to your build parameters. Name it env.Confirm (make sure if matches the name in the script above) and set the default value to false. Press the “Edit…” button to create a new variable specification. You will be presented with a form with the following fields:

  • Label – this is the text that appears to the left of the checkbox. I set it to something like “This is a production deployment”.
  • Description – this is the text that appears beneath the checkbox. I set it to something like “Are you sure?”.
  • Display – set this to “Prompt”, we want TeamCity to prompt for this value whenever a build is requested.
  • Type – set this to “Checkbox” with the checked value being true and unchecked value being false.

That’s it! From now on when you click the “Run” button, you should get the prompt above. Also note that the build log will contain the message output from the script above so that it becomes very clear why a build failed if someone doesn’t click the confirm checkbox.

One Catch

The only catch I have found with this approach is that despite the default value of our checkbox being set to false, TeamCity has a “feature” that stores the last value of the checkbox in some session state (cookies, session storage, etc.). So if you run a build, enable the checkbox, and five minutes later try to run the build again, the checkbox will already be checked for you. It seems only after twenty minutes or so, or however long it takes for your session to expire, will it reset back to the correct behaviour.

This isn’t a big deal, even if the checkbox is pre-enabled due to this “feature” in TeamCity, the prompt will still appear, so you’re still turning a one-click deployment into a two-click deployment.

Dynamically Generating Lambda Expressions at Runtime From Properties Obtained Through Reflection on Generic Types

Lately I’ve been having to export some of my data entities into CSV files, and I’ve been using the CSVHelper nuget package to achieve this. As is common, property names don’t translate well into readable column headers, so you have to provide some kind of property to string mapping.

This is how CSVHelper handles it:

namespace MyApplication.CSVMapping
{
	public class MyModelCsvMap : CsvClassMap
	{
		public override void CreateMap()
		{
			Map(m => m.Id).Name("Model Id");
			Map(m => m.Description).Name("Model Description");
			Map(m => m.StartDate).Name("Start Date");
			Map(m => m.EndDate).Name("End Date");
			Map(m => m.RunDate).Name("Run Date");
		}
	}
}

Nothing too fancy, just passing my model type into the derived class, and going through each class member, setting the Name property.

However, as is also common, I may also have a form tied to this model and I want to use the built in DataAnnotations to set the form labels for each field, like so:

namespace MyApplication.Models
{
	public partial class MyModel
	{
		[DisplayName("Model ID")]
		public int Id { get; set; }
		[DisplayName("Model Description")]
		public string Description { get; set; }
		[DisplayName("Start Date")]
		public DateTime StartDate { get; set; }
		[DisplayName("End Date")]
		public DateTime EndDate { get; set; }
		[DisplayName("Run Date")]
		public DateTime RunDate { get; set; }
	}
}

Noticing some redundancy here? Could I perhaps have CSVHelper get the property column header names from the DisplayName Attribute in the model rather than having to create a seperate CsvClassMap? That way I wouldn’t have to repeat my property to string mappings.

For this I will have to create a generic version of the CsvClassMap class, which takes in my entity type. From there I can get all the properties in that type, and start iterating through them. For each property, I check if it has a DisplayName attribute, and if it does, get what the value is. The tricky part is passing in the property into CSVHelper’s map method which expects a Expression<Func<TEntity, object>>. Here’s the complete code:

using System;
using System.ComponentModel;
using System.Linq;
using System.Linq.Expressions;
using System.Reflection;
using CsvHelper.Configuration;

namespace MyApplication.Common
{
	public class BaseCsvMap : CsvClassMap where TEntity : class
	{
		public override void CreateMap()
		{
			PropertyInfo[] props = typeof(TEntity).GetProperties();
			foreach (PropertyInfo prop in props)
			{
				var displayAttribute = prop.GetCustomAttributes(false).FirstOrDefault(a => a.GetType() == typeof(DisplayNameAttribute)) as DisplayNameAttribute;
				if (displayAttribute != null)
				{
					var parameterExpression = Expression.Parameter(typeof(TEntity), "x");
					var memberExpression = Expression.PropertyOrField(parameterExpression, prop.Name);
					var memberExpressionConversion = Expression.Convert(memberExpression, typeof(object));
					var lambda = Expression.Lambda<Func<TEntity, object>>(memberExpressionConversion, parameterExpression);
					Map(lambda).Name(displayAttribute.DisplayName);
				}
			}
		}
	}
}

That should be fairly self explanatory. The only strange “gotcha” is having to call Expression.Convert() before constructing the lambda expression. This is because the expression explicitly expects “object” as it’s type, and your entity likely contains typed members ie. strings, ints, decimals, etc.

You can also modify the above class to working with any custom attributes that you may have defined, just remember to pass true into the GetCustomAttributes() method.

Move a ClickOnce Deployment to Another Server or Location

The goal of this post is to demonstrate how to move a clickonce deployment to another location, be it another server or another folder, without having to publish the package again.

You will need a tool called MageUI.exe which is available for download in the .NET SDK. Once installed you can find it in “Program Files\Microsoft SDKs\Windows\v6.0A\bin\MageUI.exe”.

The first step is to simply copy over the clickonce deployment folder to your new location. Next, open up MageUI.exe and select the Open command from the file menu. Search through your clickonce deployment folder for all instances of *.application files and open all of them. This is important as you will need to make changes to all *.application files for this to work.

For each *.application file, under deployment options, you will need to edit the start location to reflect on the new location you are moving your deployment to. Once you have done this for all files select the save all command from the file menu. You will be prompted to sign your package. One option for signing your package is to generate a .PFX file and point to that, providing the password that you specified when creating it. The other option is to point to a certificate that has already been stored on your machine.

Once saved, test the new deployment location by running the setup file.

How To Find, Select and Format Icons For Your Applications

Whether you do web design or desktop application development, you’re eventually going to need to include icons in your interface. Not all software developers are handy with image editing software, we can use it, like most people know how to use a paint brush, it’s just that we have trouble using the tool to make something that would meet our users expectations. Luckily there are a lot of free resources out there that provide premade icons created by people who have artistic talent.

Icon Finder – Provides a Google like image search that only returns icons
Tango Desktop Project – A pack of icons available in every format and resolution you would ever need, licensed under GPL.
Famfamfam – A collection of icons with a simple and minimalistic style to them. There’s also another pack in the same style available here.
Pixel Resort – Fairly new site, with a rapidly growing collection of icons.
Deviant Art – Probably one of the largest collections available, however it’s really hit or miss, you can find some really nice sets if you can spare the time.

It’s very likely you will find an icon that you like but isn’t provided in the size or format you’re looking for. In this case I recommend downloading Paint.NET which is a free image editing program that has excellent plugin support. If you’re working on a desktop application and require icons in .ICO format you can download the ICO plugin for Paint.NET here.

I guess now would also be a good time to talk about what image format to use for you icons. The best format for most applications is PNG. It’s small, no visible compression artifacts and supports alpha transparency. Applications built in Visual Studio support PNG icons along with transparency as do all modern browsers. As is usually the problem, Internet Explorer is the black sheep of the crowd and needs special attention when it comes to PNGs. There are still quite a few people using IE6 which does support PNGs but not PNG transparency. There is a solution to this using javascript within your CSS file to load the appropriate libraries to handle the transparency, however there are some major drawbacks to doing this as discussed here. IE7 introduces PNG transparency support, however still has the problem of incorrectly rendering colors in PNG files, seemingly oversaturating them. The next alternative is the GIF format, which also doesn’t have visible compression artifacts and allows for simple non-alpha transparency. Avoid using JPEGs whenever possible.

As far as what you should look for when choosing an icon, try to keep a consistent theme amongst your application, mixing icons from different collections and artists can give the application a rough and inconsistent feel. Apple has an article aimed at developers outlining their guidelines for icon selection and placement. While some of it is Mac specific, many ideas can be related to all applications regardless of platform or OS. Here are some highlights from the article:

  • The icon should contain a tool that communicates the type of task the application allows the user to accomplish. The Preview icon, for example, uses a magnification tool to help convey that the application can be used to view pictures. If you include a supportive tool element, it should closely relate to the base object that it rests upon.
  • Some applications that represent objects, such as QuickTime Player and Calculator, are most easily recognized by the objects themselves. When creating icons for such applications, it’s more aesthetically pleasing to create a simplified, idealized representation of the object, instead of using an actual screen shot of the software. Re-creating the object is particularly important when users could confuse the icon with the actual interface.
  • Because utility applications are normally focused on a narrow set of tasks, it’s best to keep the number of elements in the icon to a minimum. The focus should be a single object that represents what the utility does.
  • The primary purpose of a toolbar is to provide users with easy access to frequently used commands. Although toolbar icons should conserve screen real estate they should be inviting and easy to identify. Ideally, each toolbar icon should represent a unique object or action that is directly related to the command it represents. A toolbar can also contain icons that represent recognizable interface elements from elsewhere in the system when they make sense in the context of the application. If you choose to include an icon such as an Info button, be sure to preserve its meaning. Users expect such icons to mean the same thing in every context, so you should not redefine them when you use them in your toolbar.
  • Do not use a system icon, such as the yellow caution icon, in your toolbar. A system icon provides important information to the user in a specific context, such as in an alert window; using it in a toolbar blurs its meaning and dilutes it effectiveness in the system.
  • Making each toolbar icon distinct helps the user associate it with its purpose and locate it quickly. Variations in shape, color, and image all help to differentiate one toolbar icon from another. At the same time, however, an application’s toolbar icons should harmonize together as much as possible in their perspective, use of color, size, and visual weight.
  • Creating a family of visually related toolbar icons can strengthen the user’s perception of your application as being well-integrated and well-designed. One way to do this is to start with a consistent theme for the style and appearance of the icons, then introduce variations when it makes sense.

Dynamically Creating HTML Elements Using Javascript

Suppose you want your users to submit a list of items through your web page. These items could be inputted through many means such as a text box, combobox, listbox, etc. There are many ghetto solutions you could use to implement this like comma delimited lists or multiple postbacks. There are however much more elegant, and suprisingly easier ways of doing this using javascript. As an example we will start with an input box with a link below it that allows you to spawn several more input boxes. In addition, each spawned input box comes with its own delete link, allowing the user to remove items if they choose to. Each input box is given a unique incremented ID that can be easily accessed later on through postback.

Here’s the javascript that makes it work:

<script type="text/javascript" language="javascript">     
    var software_number = 1;
    function addSoftwareInput() 
    {
        var d = document.createElement("div");
        var l = document.createElement("a");
        var software = document.createElement("input");
        software.setAttribute("type", "text");
        software.setAttribute("id", "software"+software_number);
        software.setAttribute("name", "software"+software_number);
        software.setAttribute("size", "50");
        software.setAttribute("maxlength", "74");
        l.setAttribute("href", "javascript:removeSoftwareInput('s"+software_number+"');");
        d.setAttribute("id", "s"+software_number); 
        
        var image = document.createTextNode("Delete");
        l.appendChild(image);
        
        
        d.appendChild(software);
        d.appendChild(l);
        
        document.getElementById("moreSoftware").appendChild(d);
        software_number++;
        software.focus();
    }
    
    function removeSoftwareInput(i) 
    { 
        var elm = document.getElementById(i); 
        document.getElementById("moreSoftware").removeChild(elm); 
    }
</script>

And the tiny amount of html to get it to show up:

<input id="ninjainput" type="hidden" name="ninjainput" />

Next, we’ll insert an additional javascript function that will populate our ninjainput when the user submits the page.

function populateStaticInput()
{
    var n = document.getElementById("ninjainput");
    var allsoftware = "";
    for( var i = 0; i < software_number; i++)
    {
        var currentele = document.getElementById("software"+i);
        if(currentele != null)
        {
            if(currentele.value.length > 0)
            {
                if(currentele.value.length > 74)
                    currentele.value = currentele.value.substring(0, 74);
                allsoftware = allsoftware + "~<>~" + currentele.value;
            }
        }
    }
    n.value = allsoftware;     
}

Notice that we are delimiting each item with a “~<>~”. Make sure to add this attribute to your form tag: onsubmit=”javascript:populateStaticInput();” This way the javascript will run and populate our ninjainput control before the page is sent to the server. Lastly, we will need a function (the example below is in C#) that will cut up the submitted list of items into a usable format, in this case an array of strings.

public string[] GetAllSoftwareInList(string rawsoftlist)
{
    string[] asoft = rawsoftlist.Split("~<>~".ToCharArray(), System.StringSplitOptions.RemoveEmptyEntries);
    return asoft;
}

And there you have it, the user doesn’t have to endure multiple postbacks or keep track of a comma delimited list. It’s presented in an organized and intuitive manner to the user and not too painful to implement for the developer.

Releasing Files In Use By Other Processes

When developing an application that uses a SQL Server Compact Edition database, you may run into a problem getting your application to build if you frequently compile it to test changes. Specifically the following error:

Problem generating manifest. The process cannot access the file ‘C:\…\mydb.sdf’ because it is being used by another process.

The problem is that your application didn’t properly release its lock on the SQLCE database file the last time you ran it. I find this especially happens when you’re debugging and hit an unhandled exception. Since your application runs as a child of the devenv.exe (Visual Studio) process, closing and reopening Visual Studio will release the lock on the SDF file and allow you to successfully compile again. Obviously, restarting Visual Studio everytime you want to test your application isn’t very convenient.

There is an easier solution to this problem. You’ll need to download Process Explorer, a free utility provided by Microsoft. According to the website, “Process Explorer shows you information about which handles and DLLs processes have opened or loaded”. This is precisely what we need to release the SDF file that Visual Studio has taken hostage.

So open up Process Explorer, and using the “Find Handle or DLL…” feature search for “sdf”. You may end up with several results, but what you’re looking for is the SDF that you use in your application. Once you find it, double click it. The file will then appear highlighted on the bottom half of the window, right click it and select “Close Handle”. The lock on the file will be destroyed, allowing you to successfully build your application without getting manifest generation errors.